Estimating a ductwork replacement for a Malibu home is as much about design and logistics as it is about materials. Hillside layouts, ocean air, and varying access conditions make each project unique. This guide explains how to scope your project, what information a provider needs to prepare an accurate plan, and the checkpoints that keep work on schedule. As you build your understanding, it helps to learn the core principles of duct replacement so you can evaluate proposals with confidence.
Rather than focusing on numbers, we will outline the steps that shape a reliable estimate: documenting existing conditions, defining comfort goals, selecting materials, and accounting for access and code requirements. With a clear plan, you can avoid surprises and ensure your new system delivers even temperatures, quiet operation, and clean indoor air.
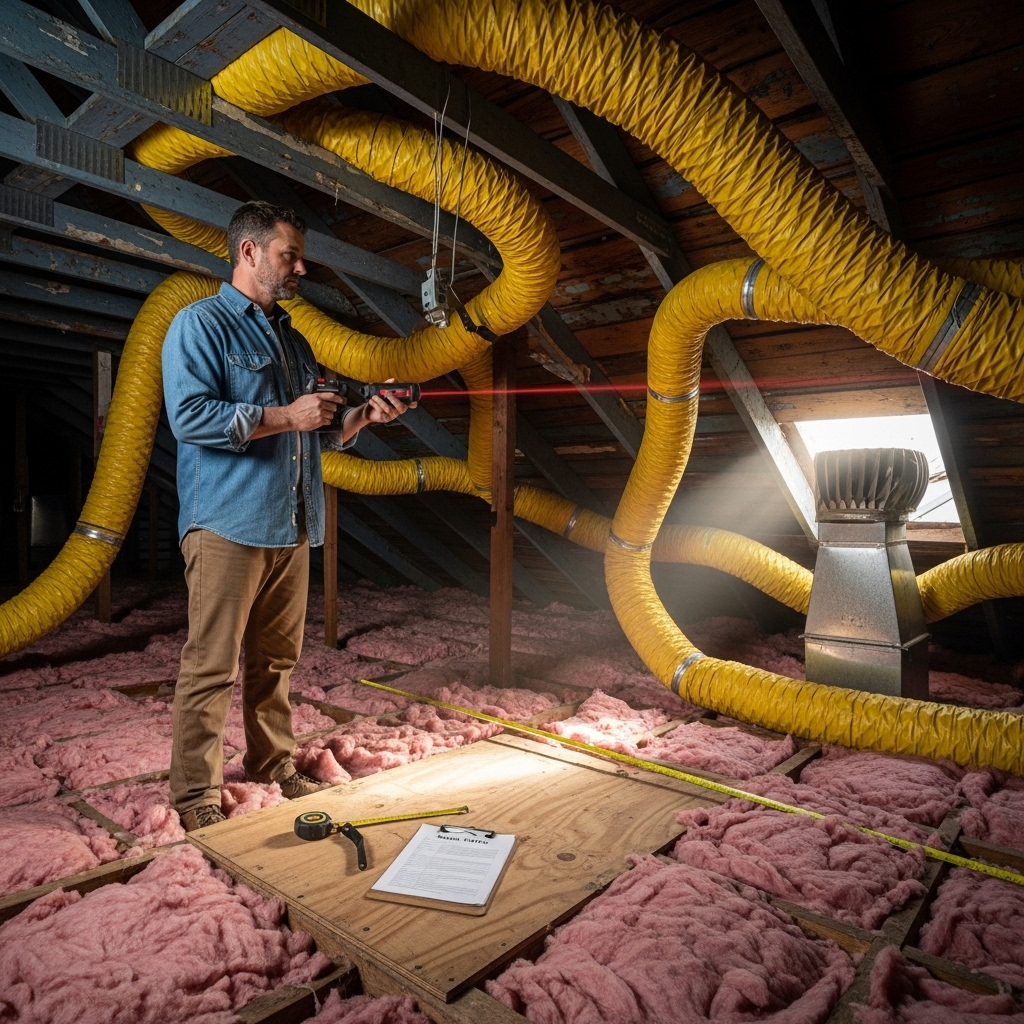
Start With a Thorough Assessment
A good estimate begins with accurate information. Before inviting providers to bid, collect the following details about your home:
- Home layout: Square footage, number of levels, and locations of key rooms that struggle with comfort.
- Access points: Attics, crawlspaces, and mechanical rooms, including headroom and obstructions.
- Equipment data: Model numbers, filter sizes, and recent service notes.
- Visible duct condition: Corrosion, crushed runs, disconnected sections, or insulation gaps.
- Air quality concerns: Allergies, wildfire smoke exposure, or odors.
Sharing clear photos of attics and crawlspaces helps providers plan routing and support strategies. The more detail you provide, the more precise your estimate will be.
Define Your Comfort and Air Quality Goals
Be specific about outcomes. Which rooms run hot or cold? Are there noise-sensitive areas like bedrooms or offices? Do you want to upgrade filtration to address smoke or allergens? Goals influence sizing, diffuser choice, and return strategies, all of which shape the scope and materials in your estimate.
Material and Method Selections
Providers typically propose a combination of materials suited to Malibu’s environment:
- Rigid metal for main trunks and long runs where smooth airflow matters most.
- Fiberglass-lined metal for select runs to help with noise attenuation.
- High-quality flex for short connections in tight spaces when properly supported.
Insulation and sealing methods are equally important. Expect details on insulation levels, sealing products, hanger spacing, and approaches to boots and penetrations. In coastal conditions, corrosion-resistant fasteners and moisture-aware detailing protect longevity.
Accounting for Access and Logistics
Access conditions influence schedule and scope. Tight attics may require special tools or partial ceiling access. Crawlspaces with limited clearance increase labor time and dictate how runs are supported. Knowing these constraints upfront allows providers to plan realistic timelines and staging strategies.
Airflow Balancing and Verification
A comprehensive estimate includes balancing at the end of installation. This means measuring supply and return flows, adjusting dampers, and verifying static pressure. Consider this step non-negotiable—it is the bridge between a good design and real-world performance.
Permits, Codes, and Inspections
Local requirements in Malibu help ensure safe, durable installations. Your estimate should reflect the steps and documentation needed for permits and inspections, as well as any coordination with other trades for electrical, framing, or access adjustments.
Creating a Clear Scope of Work
Ask prospective providers to present a scope of work that describes:
- Design assumptions and airflow targets.
- Materials, sealing methods, and insulation levels.
- Support spacing and routing strategies for tight areas.
- Protection and cleanup procedures inside the home.
- Balancing and final documentation deliverables.
Clarity here prevents misunderstandings later and helps you compare proposals apples-to-apples.
Timeline Basics
Most projects follow a similar arc:
- Assessment and documentation of existing conditions.
- Design and material selections.
- Protection and staging.
- Removal of old ductwork.
- Installation of new runs with proper sealing and insulation.
- Balancing, testing, and final walkthrough.
The actual duration varies with access, layout complexity, and any mid-project discoveries. Build in checkpoints for decisions so adjustments do not derail progress.
How to Compare Proposals
Look beyond headline summaries. Detailed proposals specify materials, diffuser types, insulation coverage, and balancing plans. Strong candidates also provide sample documentation from past projects and discuss how they will handle surprises, such as hidden framing conflicts or deteriorated returns.
Anticipating Mid-Project Discoveries
Once old ducts are removed, the team may uncover conditions that suggest route changes or the need for additional returns. A flexible plan with predefined decision points lets you evaluate trade-offs calmly. During these points, many homeowners revisit the basics of duct replacement to ensure the evolving plan still aligns with comfort, noise, and air quality goals.
Documentation You Should Receive
Quality providers deliver a final packet that includes:
- As-built drawings or notes on routing and register locations.
- Airflow measurements for supply and return at key locations.
- Static pressure readings that confirm system health.
- Filter specifications and maintenance intervals.
- Notes on any remaining access considerations for future service.
Maintenance After the Project
Protect your new system with simple routine care:
- Replace filters on schedule and sooner after smoke events.
- Keep returns unobstructed and vacuum grilles periodically.
- After attic work or strong winds, visually check accessible runs and supports.
- Plan periodic performance checks to confirm airflow targets are maintained.
Frequently Asked Questions
Q: Can I keep parts of my existing ducts?
A: In some cases, yes—if remaining sections are properly sized, structurally sound, and clean. Your provider should inspect them carefully and explain any implications for airflow or noise.
Q: How do providers predict airflow balance in the estimate?
A: They calculate room-by-room needs based on layout and insulation assumptions, then design trunks and branches accordingly. The final step is on-site balancing to validate the design.
Q: What materials are best for quiet operation?
A: Smooth transitions, adequate return capacity, and correct velocities matter most. Material choice supports these strategies; for example, rigid metal provides smooth interiors, while lined sections can help on specific runs.
Q: Do I need permits for ductwork changes?
A: Local requirements typically call for permits and inspections. Experienced providers plan for this and coordinate the necessary documentation.
Q: How do Malibu’s conditions affect long-term performance?
A: Moisture, salt exposure, and occasional smoke events mean sealing, insulation, and corrosion-resistant details are especially important. Regular maintenance extends system life.
Putting It All Together
An accurate estimate reflects your home’s specifics, your comfort goals, and Malibu’s environment. When proposals show clear design assumptions, material choices, and a balancing plan, you can proceed with confidence. The result is a system that quietly delivers comfort and clean air, day in and day out.
Take the Next Step
If you are ready to move from research to action, start by documenting your home’s layout, access conditions, and comfort priorities. Share photos and notes with prospective providers, and ask for design assumptions and balancing plans in writing. To proceed with clarity, explore professional duct replacement solutions and schedule a consultation that aligns scope, schedule, and performance goals for your Malibu home.