Planning a new cooling system in Malibu involves more than choosing a brand and a model. Coastal air, hillside microclimates, HOA rules, and local permitting all influence the scope and duration of a successful project. This guide explains the typical phases of a professional installation, the factors that influence budget ranges without citing numbers, and what you can do to streamline the process. By the end, you will understand how homes near the ocean differ from canyon properties, what to expect on installation day, and how to prepare for inspections and commissioning. If you want a quick refresher on system basics and performance considerations, you will find practical insights woven throughout—beginning with how Malibu’s environment affects air conditioning choices from day one.
Because Malibu sits at the crossroads of coastal fog and inland heat, equipment sizing and airflow design require careful analysis. A system that is too large will short-cycle on mild days and leave indoor air clammy; one that is too small will struggle during late-summer heat waves. Smart planning avoids both extremes.
What drives installation scope in Malibu
- Home size and layout: Square footage, ceiling height, and room distribution determine the cooling load and duct strategy. Open plans often benefit from zoning to handle solar gain on west-facing glass.
- Duct condition: Existing ductwork may be undersized, leaky, or poorly insulated—especially in older homes or those with rooftop equipment exposed to UV and salt. Upgrades can be the difference between a great install and ongoing comfort complaints.
- Equipment type: Central split systems, heat pumps, and ductless mini-splits each have strengths. In coastal Malibu, heat pumps are popular for efficient, year-round comfort; ductless systems can solve tricky additions or detached studios.
- Efficiency targets: Higher-efficiency systems often require larger coils and specific airflow. Matching indoor and outdoor units to the load and duct design is critical for real-world performance, not just ratings on paper.
- Electrical readiness: Panel capacity, dedicated circuits, and code-compliant disconnects affect scheduling. Older homes may need electrical work before installation can begin.
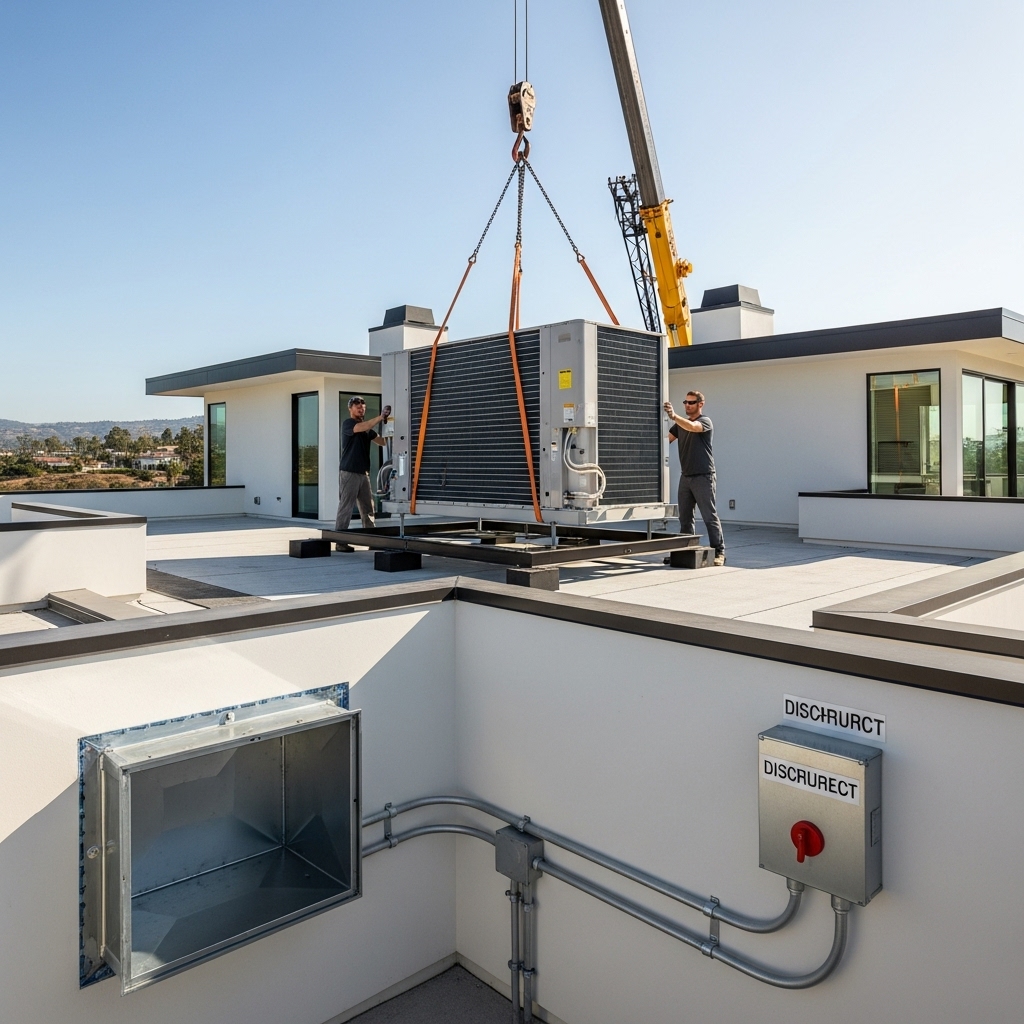
- Placement constraints: Property lines, setbacks, and sound ordinances affect outdoor unit location. Rooftop units may require crane access and anchorage details, which extends planning.
- Corrosion protection: Coastal coatings, stainless hardware, and UV-resistant line-set insulation improve longevity near the ocean and should be planned up front.
- Permitting and inspections: City of Malibu permitting, adherence to California energy codes, and final inspections shape the timeline. Projects that include duct replacement also require testing and documentation.
The timeline from consultation to cool air
- Initial consultation and goals: A contractor gathers information about comfort issues, rooms that overheat, expected occupancy, and lifestyle rhythms. They document equipment location constraints and note HOA guidelines if applicable.
- Load calculation and system design: A room-by-room load calculation informs capacity selection. The contractor evaluates duct size, layout, and static pressure to ensure the chosen equipment can breathe. Zoning, return air strategy, and filtration are finalized here.
- Proposal and scope review: Instead of focusing on a single number, compare the scope: equipment model pairing, efficiency ratings, control strategy, duct corrections, accessories, and corrosion protection. Clear scope descriptions translate into a smoother installation day.
- Permitting: Your contractor submits documentation to the local authority, including system details and, if ducts are involved, required testing. Permit review times vary with workload and project complexity.
- Pre-install prep: You’ll clear access, move vehicles for driveway or crane staging if needed, and secure pets. The contractor arranges equipment, materials, and any specialty coatings for coastal exposure.
- Installation day(s): Crews remove old equipment if present, set the new condenser on a leveled pad or roof curb, install the air handler/coil, run or replace line sets, set the condensate drain with proper slope, and seal duct joints. Electrical connections and controls are made and labeled.
- Commissioning: Technicians verify airflow, refrigerant performance, thermostat operation, and safety controls. They document operating parameters, fine-tune fan speeds, and check that registers balance room-to-room comfort.
- Inspection: The city inspects for code compliance, including clearances, disconnects, anchorage, and proper sealing. Projects with duct work undergo testing to confirm leakage and airflow standards.
- Owner orientation: You learn filter sizing and placement, thermostat features, maintenance intervals, and what to monitor during the first cooling season.
Preparing your home and site
Clear a path to the equipment areas, from driveway to mechanical room and to the outdoor pad or roof access. Protect artwork and fragile items from vibration. If cranes are involved for rooftop work, coordinate parking and street access. For homes close to the surf, discuss protective coatings for coils and fasteners, and UV-resistant insulation for line sets.
Design details that pay off
- Returns and filtration: Adequate return air and a filter rack that accepts quality filters prevent noise, whistling, and comfort swings. Poor return design is a top cause of short cycling and hot rooms.
- Airflow and static pressure: Correct duct sizing and smooth transitions keep static pressure in check, enabling the system to deliver its rated capacity.
- Condensate management: Proper slope, cleanouts for maintenance, and a reliable shutoff switch protect from water damage—especially important in second-floor or attic installations.
- Controls and zoning: Smart thermostats and zone dampers can address solar gain in wings that face west without overcooling the rest of the home.
- Noise and placement: Locating the outdoor unit away from bedrooms and choosing vibration-isolating mounts help meet Malibu’s quiet-evening expectations.
Midway through planning, it helps to revisit decision points and confirm they still match your needs. Reconfirm equipment type, return air strategy, and corrosion protection before materials are ordered. This is also a good time to revisit the fundamentals of modern air conditioning performance so the final system aligns with your priorities for comfort, sound, and longevity.
Comparing proposals beyond a single number
- Clarity of scope: Do proposals list model numbers, coil matches, and accessories? Are duct repairs quantified and located?
- Commissioning steps: Look for airflow verification, refrigerant performance testing, and thermostat setup in writing.
- Durability upgrades: Coastal coatings, stainless fasteners, and UV-resistant insulation should be explicit if your home is near the ocean.
- Warranty terms: Understand equipment and labor coverage periods and what actions keep them in force.
- Post-install support: Ask how to schedule the first tune-up, what documentation you’ll receive, and whom to contact for questions.
Common pitfalls to avoid
- Skipping the load calculation: Rules of thumb lead to oversizing, humidity problems, and unnecessary cycling in Malibu’s mild mornings and warm afternoons.
- Underestimating duct issues: New equipment cannot overcome undersized returns or leaky supply runs. Address duct design during the install, not after comfort issues appear.
- Neglecting condensate planning: Attic and closet installations need thoughtful drainage and shutoff protection to avoid water damage.
- Overlooking corrosion: Uncoated coils and standard hardware deteriorate faster near salt air, reducing efficiency and reliability.
- Ignoring placement constraints: Setbacks, neighbor noise concerns, and access for maintenance should be resolved before installation day.
Permitting, inspections, and local considerations
Every permitted installation culminates in an inspection. Inspectors verify electrical safety, refrigerant line protection, equipment anchorage, clearances, and proper sealing of penetrations. Projects with new or replaced ducts undergo testing and documentation. Preparing a clean, accessible site and having documentation ready helps pass on the first visit.
After installation: the first 30 days
During the first weeks, monitor how the system cycles at different times of day and note any rooms that consistently lag. Check the filter after two weeks—construction dust and debris can load it quickly. Practice with the thermostat features and fine-tune schedules to fit your routine. If anything seems off, contact your contractor for adjustments while the details are still fresh.
Frequently asked questions
Q: How long does a typical installation take? A: Simple replacements can be completed in a day, while projects with duct upgrades, electrical work, or rooftop placement commonly extend into a second day or more.
Q: Are heat pumps a good choice near the ocean? A: Yes. Modern heat pumps perform efficiently in Malibu’s moderate climate and provide year-round comfort. Coastal protections are recommended to extend life.
Q: What documents should I receive after the job? A: Expect equipment model details, commissioning records, thermostat setup notes, and any required test results.
Q: How do I minimize noise? A: Choose a suitable outdoor location, include vibration isolation, and ensure duct design keeps airflow smooth and static pressure moderate.
Q: Do I need a smart thermostat? A: While not mandatory, smart controls can adapt to Malibu’s variable temperatures and improve comfort and efficiency.
Take the next step with confidence
When you’re ready to begin, gather a few well-scoped proposals, ask about design and commissioning, and plan around permitting and inspection timelines. If you want a deeper primer on system types and performance considerations for coastal homes, talk with a local expert who can tailor recommendations to your property and lifestyle—and help you select and set up air conditioning you’ll enjoy for years to come.