Installing an air conditioning unit in Malibu, California is a project that blends technical precision with coastal awareness. While homeowners can prepare the site, plan airflow, and understand the sequence of work, many steps require licensed professionals due to electrical, refrigerant, and code considerations. The purpose of this guide is to explain the process clearly—so you can make informed decisions, coordinate timelines, and know what quality looks like when the work is complete. If you are evaluating options for air conditioning installation, use this step-by-step overview to organize your project.
Malibu’s climate introduces specific challenges: salty marine air that accelerates corrosion, hillside lots that complicate access, and microclimates that demand accurate sizing. Designing for quiet operation is important for both indoor serenity and neighborly consideration. With good planning, appropriate equipment choices, and a careful installation, your system can deliver reliable comfort through summer heat waves and shoulder seasons alike.
Safety and Code Considerations
Air conditioning installations involve high-voltage electricity, refrigerant handling, and mechanical work that must meet California Title 24 energy standards and local Malibu building codes. Permits are typically required, and some projects need HERS testing for duct leakage, airflow, and refrigerant charge verification. Licensed professionals handle these tasks, manage safe refrigerant recovery and charging, and ensure compliant electrical work. As a homeowner, you can prepare the site, discuss comfort goals, and oversee access and scheduling.
Step 1: Define Comfort Goals and System Type
Clarify whether your home is best served by a central split system, a ductless mini-split, or a heat pump. Consider zoning for multi-level homes or spaces with uneven solar exposure. Discuss sound levels, filtration needs, and smart thermostat preferences. Malibu’s mild winters make heat pumps particularly attractive for efficient cooling and comfortable heating.
Step 2: Load Calculation and Duct Strategy
Right-sizing prevents short cycling and improves humidity control. A Manual J calculation accounts for insulation, windows, orientation, and infiltration. If you have ducts, evaluate them for leakage, sizing, and routing. Many Malibu homes benefit from sealing and select resizing to balance rooms and reduce noise. If ducts are impractical, ductless systems can provide targeted comfort with minimal disruption.
Step 3: Plan Equipment Locations
Choose an indoor air handler location with adequate service clearance, condensate drainage, and sound isolation. For outdoor condensers, select a spot with free airflow, minimal exposure to salt spray and wind, and distance from bedrooms or quiet patios. Ensure that the location preserves views and allows for maintenance. Use anti-vibration pads and corrosion-resistant hardware appropriate for coastal conditions.
Step 4: Electrical and Condensate Planning
Verify electrical capacity and plan for a dedicated circuit and code-compliant disconnect. Place the thermostat away from direct sun and supply vents for accurate readings. For condensate, design a sloped, trapped drain with a float switch to prevent overflow. Identify a safe termination point that avoids staining exterior surfaces and creating slip hazards.
Step 5: Prepare the Site
Clear access paths, protect floors, and stage tools and materials. Outdoors, level the condenser pad and confirm drainage away from structures. If mounting on a deck or roof, confirm structural support and follow anchoring requirements. Seal wall penetrations against pests and air leaks and protect line sets with UV-resistant insulation.
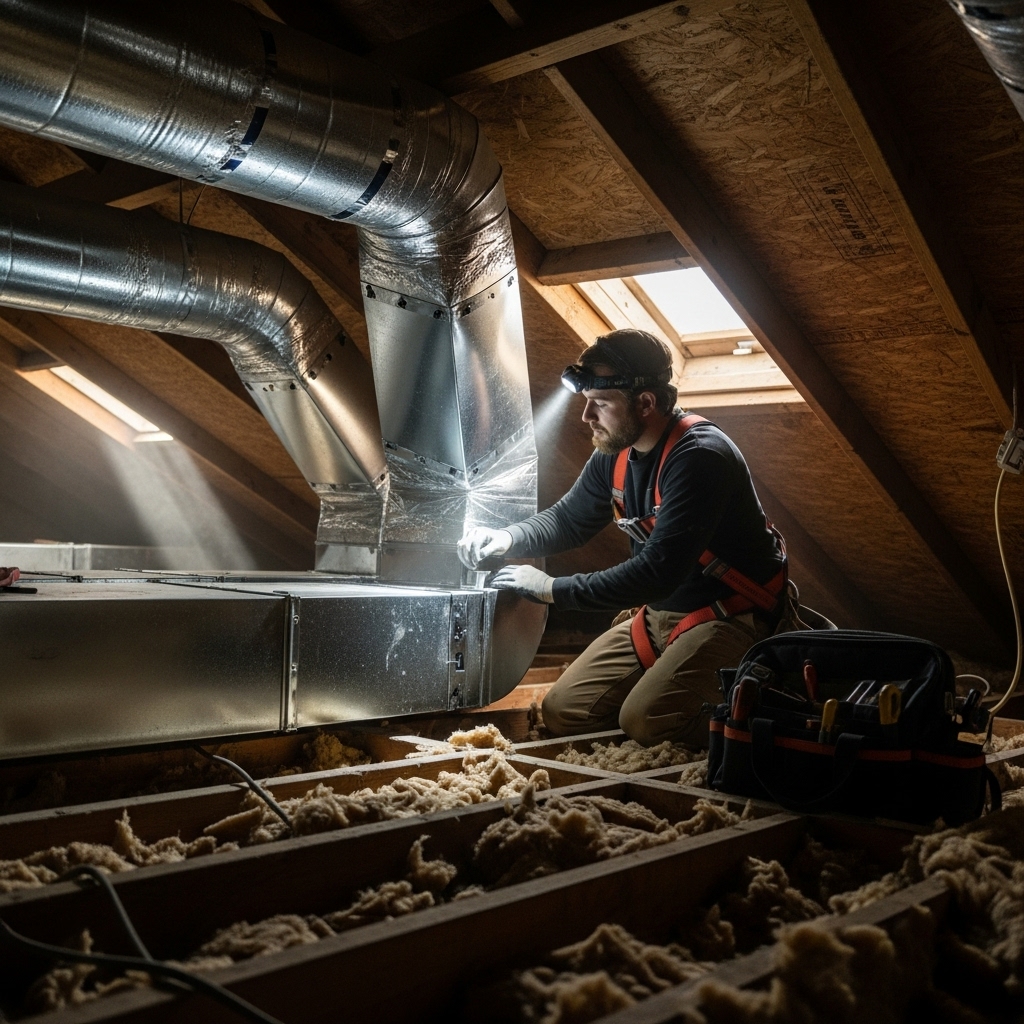
Step 6: Install or Improve Ductwork
When ducts are part of the plan, use smooth-radius fittings, minimize restrictions, and seal all joints with mastic. Insulate ducts in unconditioned spaces to meet code. Plan return grille placement for quiet operation and convenient filter access. Balancing supply and return paths improves comfort across rooms and levels.
Step 7: Set Indoor Equipment
Mount the air handler or coil level and secure it for serviceability. Connect the condensate drain, verify slope, and test safety switches. Route refrigerant lines with gentle bends and protect them from abrasion. Keep electrical wiring tidy and labeled. Maintain clearances recommended by the manufacturer for filter replacement and service access.
Step 8: Place Outdoor Condenser
Position the condenser on a stable, level pad or properly anchored stand. Confirm required clearances on all sides and overhead. Use corrosion-resistant fasteners and consider coastal protective coatings. Install anti-vibration pads, verify airflow paths, and keep the area free of landscaping that might block discharge air.
Step 9: Electrical Connections and Controls
Connect the dedicated circuit and install the outdoor disconnect. Wire low-voltage controls and place the thermostat where it can sense representative temperatures. If using smart controls, complete Wi‑Fi setup and basic programming. Label breakers, switches, and control wiring to aid future service.
Step 10: Pressure Testing and Evacuation
Pressure-test the refrigerant lines with nitrogen to verify leak-free connections. Evacuate the system to manufacturer-recommended micron levels to remove air and moisture. Hold the vacuum to confirm tightness before releasing refrigerant. These steps are critical for efficiency and long-term reliability.
Step 11: Start-Up and Commissioning
Power the system and verify proper airflow, blower speeds, and quiet operation. Measure superheat and subcooling, record temperature split, and confirm thermostat control sequences. For zoning, test each zone individually and balance airflow. Provide written commissioning data that shows the system meets design targets.
Step 12: Final Inspection and Homeowner Orientation
Coordinate HERS testing and municipal inspections as required. Review the system with the homeowner: filter sizes and replacement schedule, condensate line care, outdoor coil cleaning, and thermostat features. Keep documentation with model numbers, commissioning readings, and maintenance recommendations.
Tools and Materials Checklist
- Level pad or mounting stand and anti-vibration pads
- UV-resistant line-set insulation and protective coverings
- Mastic and duct insulation where applicable
- Float switches, traps, and condensate fittings
- Electrical disconnect, properly sized breakers, and wiring
- Sealants for wall penetrations and pest barriers
- Smart thermostat and sensors if zoning or advanced control is planned
Common Pitfalls and How to Avoid Them
- Oversizing equipment, leading to short cycling and poor humidity control—avoid by insisting on load calculations.
- Neglecting duct leakage and return placement, which creates hot and cold spots—address with duct assessment and design.
- Poor condenser placement that recirculates hot air—provide adequate clearances and airflow paths.
- Skipping condensate safety switches—install float protection to prevent water damage.
- Inadequate corrosion protection near the coast—use coastal-rated components and periodic coil rinsing.
Maintenance for Coastal Reliability
Plan regular filter changes, outdoor coil rinsing, and seasonal tune-ups. Keep shrubs trimmed around the condenser and verify that the drain line remains clear. Smart thermostats can alert you to unusual runtimes or temperature swings that signal a need for service. Good maintenance extends equipment life and preserves quiet performance.
Frequently Asked Questions
Q: Can I install an air conditioner myself?
A: Homeowners can prepare the site and understand the steps, but electrical work, refrigerant handling, and permitting typically require licensed professionals. Working with qualified installers protects safety, performance, and compliance.
Q: Do Malibu homes need special equipment?
A: Coastal-rated condensers, stainless hardware, and protective coatings are smart choices near the ocean. Variable-speed systems often deliver quieter, more comfortable operation for Malibu’s environment.
Q: How do I know if my ducts are good enough?
A: A duct leakage test and design review can identify issues. Many homes benefit from sealing and select resizing to improve room-to-room balance and efficiency.
Q: Are heat pumps a good fit?
A: Yes. Malibu’s mild winters align well with modern heat pumps, providing efficient cooling and comfortable heating with variable-speed technology.
Q: What if my property has limited access?
A: Work with installers who understand Malibu logistics. They’ll plan staging, coordinate deliveries, and choose equipment placements that respect access constraints while preserving performance.
Q: How can I make the system quieter?
A: Choose quiet-rated equipment, isolate vibration, design smooth duct paths, and place the condenser away from bedrooms or seating areas. Commissioning helps fine-tune fan speeds and balance for quiet operation.
Q: What should my final documentation include?
A: Commissioning data, model and serial numbers, filter sizes, thermostat settings, and maintenance recommendations. Keep these records for service and service needs.
Bring It All Together
Success comes from accurate sizing, careful placement, quality workmanship, and thorough commissioning—topped off with consistent maintenance. When each step is deliberate, you get a system that cools efficiently, controls humidity, and fits your home.
Plan Your Malibu Installation with Confidence
If you prefer a trusted team to handle design, permitting, installation, and commissioning while you oversee the big picture, schedule your air conditioning installation with experienced Malibu professionals and enjoy cool, quiet comfort season after season.